A “down and dirty” look at disassembly and cleaning of a Hyla Vacuum Electro-Brush.
A couple of weeks ago I was being a good hubby and was helping out with some household chores. We have a Hyla NST vacuum and Amy got it out of the closet to start cleaning the floors.
There are two main attachments for the Hyla NST. One is for hard/smooth floors and the other is for carpet. I noticed that she was running the smooth floor sweeper on our rug in the living room , so I asked why? “The [Electro-Brush] is throwing white dust when I use it, so I just use this one.” Wha? This is a thousand dollar machine and it’s not doing any good using the wrong attachment.
So I decided to investigate. The problem was that the Hyla Electro Brush was stopped up with various stuff, mainly some type of deodorant powder that she sprinkled on the carpet before vacuuming. This stuff had built up and started trapping more dirt and debris until the passage way was mostly blocked. It was also this stuff that was fogging out of the brush.
The only way to clean it out was to disassemble it. Of course i turned to Google first, but I found precious little about it. The user-guide on Hyla’s website was no help either, so I decided to take a couple of pictures and document the procedure for the benefit of someone else who may have the same problem.
Of course this information carries no warranty. This procedure was successful for me but your mileage may vary.
Tools needed: Phillips screwdriver and flat-head screwdriver or something similar for prying.
First, disconnect the Electro-Brush from the vacuum and any power source and flip it over. There are six screws to loosen and/or remove on the bottom.
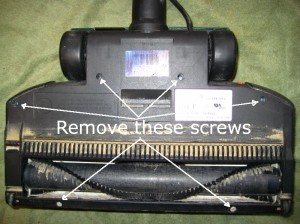
Once those screws are out, flip it right side up and remove the top cover. This can be done with a flat screwdriver or other prying tool. Take your time as plastic parts can break pretty easily, but once you get it started it comes right off. The build quality of the Hyla is pretty good and the plastic is relatively tough.
With the top cover removed, you can see a white inner cover. Two screws hold this cover on. Remove those.
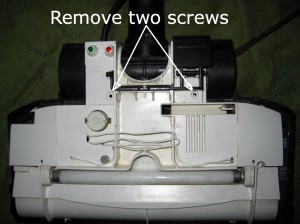
Before removing the white inner cover, unwrap the white lamp wires from the slots in the cover. You want to push those wires down through the slot in the inner cover as you remove it. This will prevent the wires from being disconnected from the ballast underneath. Ask me how I figured this one out! You’ll want to eventually disconnect these wires, but you need to see where they go first.
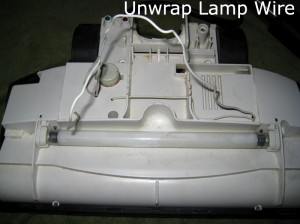
The handle catch lever also needs to be removed. This is the “trigger” that you push with your foot to release the handle from the upright position. It just snaps into place. The thing to watch out for here is the little spring underneath the lever. Make sure you don’t lose it.
Now you can remove the inner cover and the tubular handle.
It’s a good idea to mark the ballast wires where they connect to the circuit board and go ahead and unplug them to get the cover out of the way.
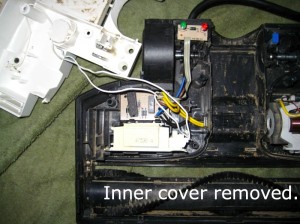
Now you’re ready to give the air passage ways a good cleaning. I used the same flat screwdriver to scrape and chisel the build-up away. I also had quite a bit of string, hair, etc. wrapped around the ends of the rotating brush head, so I cleaned that off as well.
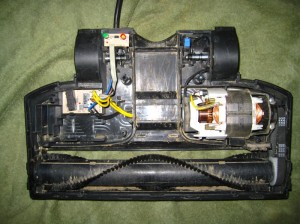
Once you’re happy with the cleaning it’s time to re-assemble. Basically just reverse the order of the steps above. Remember to re-attach the tubular handle and the ballast wires before installing the inner cover. Pull the lamp wires back through the cover as you lower it down onto the base. After replacing the screws in the inner cover, re-wrap the lamp wires.
Install the handle release lever (don’t forget the spring!), then the outer cover. Flip the assembly back over and re-install the six screws from the bottom.
Congratulations! Your Hyla should suck as good as new. It was unbelievable how much dirt was in the water tank when I got through vacuuming the first time after doing the cleaning.
Prevention is better than cure, so from now on we’re not going to use any of the carpet powder, but eventually this will have to be done again. At least I’ll have this post to refer to.
If this information helped you, let me know in the comments.
Brett
Leave a Reply
You must be logged in to post a comment.